East & Middle Tennessee
How thermal drone deer recovery works
An aerial search brings together thermal imaging, detailed camera inspection, and a plan built around your deer. Here's how we put those tools to work for hunters in East and Middle Tennessee, from the last sign to a closer look at the buck.
Find the contrast. Inspect the details. Follow the clues.
A useful search is about much more than putting a drone in the air. We combine what you know about the shot with a view of the property from above, then inspect points of interest carefully. DJI Matrice 4T thermal drones give us complementary camera views: thermal imaging to look for temperature patterns and visible-light cameras to examine the details. Your account of the hunt connects those views to the deer we're looking for.
01 / Thermal imaging
How a thermal camera turns infrared energy into a picture.
Thermal imaging starts with infrared energy. Animals, vegetation, soil, rocks, and water all emit thermal radiation. A thermal camera detects differences in the infrared energy reaching its sensor and turns those differences into a picture. Instead of relying on the colors of a deer against leaves or grass, the pilot can examine a view organized around apparent surface temperatures.
The camera's image processing translates those readings into shades or colors. In a white-hot view, relatively warmer parts of the scene appear lighter; in a black-hot view, they appear darker. Other palettes represent the same thermal scene with different colors. These display choices give the pilot different ways to study the contrast and shape within a scene.
For deer recovery, this creates another way to examine the ground. A pattern with a deer-like size, shape, and position can draw the pilot's attention and become a point for closer inspection. The thermal image starts that inspection; the pilot then brings the other clues together.
02 / Reading the thermal view
Why temperature contrast is useful in a deer search.
Contrast is the difference between a subject and its surroundings. In a thermal view, a deer may appear different from nearby leaves, grass, or soil because of the infrared energy coming from its visible surfaces. That difference can help direct attention to a shape that blends into the same scene in a regular camera image.
The pilot reads the whole pattern: approximate body size, the outline of the torso, the position of the head and legs, and the relationship to the ground around it. A thermal feature becomes more useful when several of those details fit together. Switching display palettes or adjusting the view can help the pilot examine that pattern with fresh contrast.
Thermal imaging is also valuable because the sensor uses emitted infrared energy rather than depending on sunlight. It gives the pilot a way to examine temperature patterns during a planned evening search. A regular camera view can then contribute recognizable detail, adding another layer to the inspection.
8 seconds / Silent drone footage
From thermal view to woodland detail
Watch the thermal view move closer before the camera switches to the buck among woodland branches.
Read the clip description
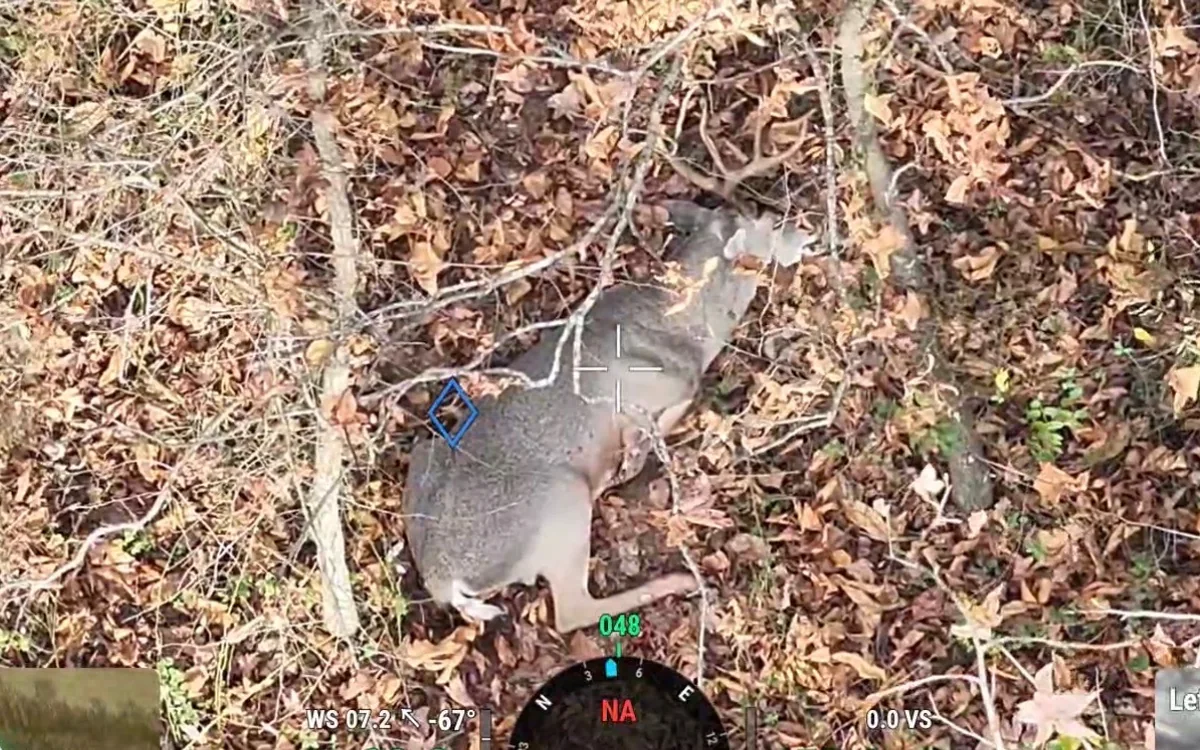
The controller shows a bright pattern in a thermal woodland view, magnifies that pattern, then switches to a visible-light view of a buck among branches and leaves.
03 / The aerial perspective
Turn your last sign into a view of the surrounding ground.
Your last marked sign is the starting reference for a bigger picture. From above, the pilot can relate that point to a field edge, wooded slope, creek bottom, hollow, or change in cover. Those connections help organize the search around the route you observed and the surrounding places worth checking.
In East Tennessee, a plan can follow the relationship between ridgelines, hollows, and drainage routes. In Middle Tennessee, it can connect rolling fields, timber edges, and creek corridors. The flight is shaped around the individual property and the clues from your hunt, so the terrain becomes part of the search strategy.
This perspective also makes it easier to describe where a point of interest sits within the property. A location becomes more meaningful when it can be related to a familiar fence line, field corner, stream crossing, or access route. The goal is to turn the aerial view into information you can use on the ground.
1 second / Silent drone footage
Thermal contrast to camera detail
A quick switch from a thermal view to a visible-light look at a buck in woodland.
Read the clip description
The controller first shows a bright shape against darker ground in its thermal view, then switches to a visible-light camera view of a buck among leaves and branches.
04 / Detailed camera inspection
Move from a thermal point of interest to a closer look.
Once a point of interest appears, the next step is a deliberate inspection. The DJI Matrice 4T combines thermal imaging with visible-light camera options, including telephoto views. The pilot can use the thermal view to study a temperature pattern and then use the detail camera to look for recognizable features of the animal.
A wider view provides context: the animal's position, the surrounding ground, and nearby landmarks. A closer view gives attention to specific details such as the head, antlers, body markings, and visible sides. Keeping both views in mind helps connect a detailed image with the place where it was found.
The pilot can take time to inspect a point of interest from useful viewing angles within the flight plan. Looking again from another angle can reveal a tine, a body feature, or a visible mark more clearly. This is where attentive camera work adds value: it lets the pilot examine the evidence behind a possible match.
05 / Comparing the rack
Study the antlers to help identify the buck.
Your description of the rack can be one of the most useful details you share. Before the search, tell us about the points you saw, the overall shape of the antlers, and anything distinctive. A trail-camera photograph or a clear picture of the buck can give the pilot a reference to compare with the camera view.
During closer inspection, we look at the rack as a collection of features. The shape of the main beams, the arrangement of visible tines, brow-tine shape, and apparent spread all contribute to the comparison. A broken point, unusual curve, extra tine, or obvious difference between the two sides can be especially helpful when it is visible.
We work through those features alongside the body view and the location. Comparing several details creates a stronger basis for a possible identification than relying on one feature alone. The hunter's account matters throughout: you know what caught your eye before the shot, and that knowledge gives the pilot something specific to look for.
- Main-beam shape and the overall outline of the rack.
- Visible tine arrangement and brow-tine features.
- Distinctive broken points, extra tines, or asymmetry.
- How those features compare with your description or reference photograph.
06 / Looking for visible wounds
Inspect the visible sides for apparent entry and exit wounds.
The details of the shot help focus the camera inspection. Tell the pilot which side of the deer faced you, the angle of the animal, and where you believe the shot entered. If you observed the arrow or bullet impact, describe what you actually saw. That account helps the pilot know which visible areas deserve closer attention.
Using the visible-light detail view, we look for an apparent entry or exit wound where the side of the deer can be examined. A visible opening, a blood mark on the coat, or disturbed hair can become a point for closer inspection. We compare the position of that feature with your description of the shot and the orientation of the animal.
A second viewing angle can help clarify which side is being examined and how a visible mark sits relative to the shoulder, ribs, or other recognizable body features. This is a careful visual comparison: we describe the feature the camera actually shows and treat an entry or exit identification as an assessment from that view. Ground-level inspection provides the opportunity to confirm the wound details.
Thermal imaging helps guide attention to the animal; the detailed visible-light view supports the examination of antlers, coat, and visible wounds. Using each camera for its role keeps the inspection focused and gives you a clearer explanation of what the pilot has observed.
4 seconds / Silent drone footage
A closer look at the body
Thermal searching followed by a closer visible-light view of the buck and a visible body mark.
Read the clip description
The clip starts with a thermal view of a bright shape, switches to a visible-light view of a buck lying in grass, and moves to a closer view of its exposed side and a visible mark.
07 / Building the flight plan
Build the search around the trail, the terrain, and your property.
A thoughtful search begins before takeoff. We talk through the time of the shot, the last place you saw the deer, the sign you followed, and the direction of travel. Tracking notes and marked pins help connect your experience on the ground with the map used for planning.
We then relate those clues to the agreed search area. The property's shape, access points, boundaries, and terrain help organize the flight into manageable sections. Likely connections between the last sign, nearby cover, and drainage routes can receive early attention while the wider search plan gives structure to the rest of the area.
Your input remains valuable as the plan develops. A trail you know, a creek crossing you checked, or a field edge where you last heard movement can add useful context. Sharing that information directly with Will or Branson makes the flight a coordinated effort between the hunter and the pilot.
08 / Methodical coverage
Work the agreed area with deliberate, overlapping views.
An organized flight gives each section of the planned area deliberate attention. The pilot works through connected passes, overlapping adjoining views and keeping the terrain in mind. This approach helps maintain continuity as the search moves between open ground, slopes, timber edges, and other features of the property.
Points of interest receive a closer look. An uncertain shape can be revisited, inspected with a different camera view, or examined from another useful angle. The pilot can also review the transitions between sections so the ground connecting two search priorities receives attention of its own.
Thoroughness comes from that combination of planning and inspection: establish the area, work through it systematically, examine promising details, and return to places that deserve another look. Your tracking notes provide a reference throughout the process, helping the pilot keep the aerial search connected to the evidence from the hunt.
09 / From an aerial view to the ground
Make a possible find useful to the recovery effort.
When a deer is located in the camera view, the next task is to relate that view to a precise place on the property. The pilot can use map references and visible landmarks to explain the position and discuss a suitable ground approach with you. A field corner, drainage route, or recognizable change in terrain can help connect the aerial location with your knowledge of the land.
The observations from the inspection travel with that location: the visible rack features, the animal's position, and any apparent wound details. Together, those observations help you understand why the pilot has identified that deer as a possible match and what to check when reaching it.
Ground confirmation brings the aerial search and the hunter's account together. The purpose of the flight is to provide useful location information and a careful visual assessment that supports the recovery effort. Keeping the communication direct helps the hunter and pilot work from the same details.
10 / Start your search
Give your pilot the details that make a difference.
For East Tennessee, call Will at (865) 440-1848. For Middle Tennessee, call Branson at (931) 273-5256. Start with your county and the time of the shot, then describe the last sign and the direction your deer traveled. A marked pin helps the pilot understand the starting point; share that exact location privately.
For a buck, describe the rack and offer a reference photograph if you have one. Include the visible points, the overall shape, and any distinctive feature you remember. Explain the shot angle and the side facing you so the pilot has useful context for a closer inspection of the animal.
Finally, share what ground tracking has already been done and the property access you have arranged. You can discuss the flight plan, search price, and next available search time directly with your pilot. From that first conversation, the goal is a clear plan and a careful thermal drone deer recovery search built around your hunt.
- County, shot time, and last marked sign.
- Direction of travel and tracking already completed.
- Rack description and a reference photo, if available.
- Shot angle, the side facing you, and observed impact details.
- Property boundaries, access, and permission details.
Explore field photographs and drone-camera views, meet Will for East Tennessee or Branson for Middle Tennessee, and visit FAQs & contact for search timing, access, and booking details.
Thermal drone deer recovery
Put another perspective behind your deer search.
Talk directly with Will for East Tennessee or Branson for Middle Tennessee. Share your last sign and start planning a detailed, methodical thermal drone search.